A 95760-2W640 backup camera can look right from the lens side and still be the wrong part to order. The side you usually cannot see once the camera is installed—the bracket, cable exit, and plug—holds some of the most useful clues. If you have access to the original assembly or photos from a repair shop, use those details to compare it with the listing before deciding. You are trying to match a complete assembly, not simply a small black camera.
Start with the 95760-2W640 backup camera reference
The 95760-2W640 backup camera product page gives that number as its reference and lists one backup camera in the package. It identifies a Hyundai Santa Fe application, but the page also asks buyers to verify the exact model and mounting configuration. Do not treat a model name or model year as a guarantee for every vehicle that falls under it. Use the full reference from your original assembly or a vehicle-specific catalog lookup, then check the physical details shown in the gallery.
Copy the number rather than retyping it from memory. If the label is faded or partly hidden, keep a photo and ask a parts specialist to confirm the missing characters. A listing with a similar prefix is not automatically the same part. Conversely, even a matching number is a reason to finish the comparison, not a reason to ignore a connector or bracket that visibly differs.
Take a straight-on photo of the bracket
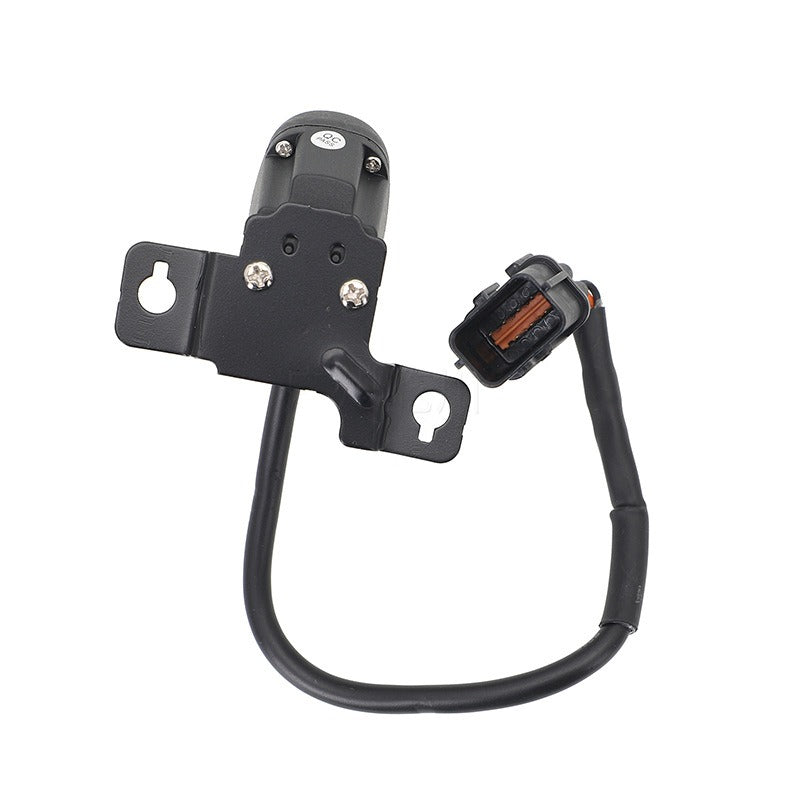
One gallery photo shows the back of the camera with a pair of keyhole-shaped mounting openings, one on each side of the bracket. Compare their orientation to the original, as well as how the camera body sits between them. A tilted photo is useful for seeing the depth of the housing, but a straight-on view is easier to use for comparing the mounting pattern.
If hole spacing or bracket offset is the only remaining question, measure the original and request the corresponding measurement for the replacement. State whether you measured center to center or from edge to edge. Do not estimate either dimension from the product photograph: perspective and display scaling can make a small difference disappear. Also check how the housing sits against the surrounding trim. Matching the openings alone does not prove that the lens will clear the same cutout.
Compare the plug face and the cable route separately
Use a close, well-lit picture of the end that mates with the vehicle harness. Compare the outline of the plug, its latch, and the guide features. Shell color alone is not a reliable way to identify a connector, and a view from the side can hide a difference at the mating face. If the connector is still plugged in or cannot be safely accessed, get a clear photo from a technician. Do not force it apart just to make a comparison.
Next, ask where the cable exits the camera and how it reaches the vehicle connector. Take an overview showing the route before anything is removed, if possible. A looped wire in a catalog photo is useful for identifying the assembly, but it does not establish the length from housing to plug. If a lead has to follow a particular path behind trim, check that requirement instead of assuming that a similar-looking wire will reach or can be rerouted.
What a photo cannot tell you
A clear picture can help you compare shapes, mounting features, and visible connector details. It cannot confirm an electrical specification, image format, or behavior on a particular display. Do not infer those from the shape of the plug or the appearance of the lens. If the vehicle has a different display or wiring than it did originally, have the configuration verified before choosing the replacement. When the fault itself is uncertain, first ask whether the camera, wiring, or display needs diagnosis.
Use the listing's package description to decide what you actually need. It identifies one camera assembly. Do not assume that it includes separate trim, extra wiring, an adapter, or mounting hardware not specifically listed. If your original bracket or connector is already damaged, identify that separately. A new camera may match the catalog reference and still leave you needing another part to complete the job.
Keep lookalike products in separate comparisons
The 86799-33050 reference backup camera listing is another example of a vehicle-specific replacement assembly. Its page lists Toyota and Lexus applications and different references. It is not a substitute for 95760-2W640. Use it as a reminder that the phrase backup camera describes a product category, not a common mounting pattern or connector. When you browse the Lighting & Electrical collection, compare the exact listing, not just the search thumbnail.
Make a three-photo check before checkout
- Take one photo of the original label or record the complete reference from the parts lookup.
- Photograph the housing and bracket straight on so the mounting openings and camera orientation are visible.
- Photograph the mating face of the connector and note the original cable route.
When asking for fitment help, send those photos with the product link and the vehicle details, and name the one difference you need resolved. A question such as whether the two bracket openings match your measured spacing is easier to answer than a broad request to confirm fit. If the reference, bracket, and plug agree but a critical dimension or specification is still unknown, leave that point open instead of guessing.
For the 95760-2W640 backup camera, the best buying check is a match on both the full reference and the details you can inspect on the original assembly. Start with the bracket and plug, verify anything a photo cannot prove, and order only when the remaining questions are resolved.